Monday, October 21, 2019

How to hide the "tells" and control skills in Poker

How to achieve good poker results  

If you are reading this, you are probably starting to practice or trying to improve your level at Poker. Read the following information to learn how to hide your tells, control them, and become an overall better poker player.

Poker is the most played game of cards in the world and it continues to become more popular every day. It can be considered a complex game as there are many rules to learn in order to start playing. There are a lot of variations of this game. Also, what makes it popular among card games' fans is that it can be played at all levels. In this article, you will learn what Poker is and how to control the tells and skills.


Resultado de imagem para poker

What is Poker?


Poker is a sport originated in the USA. It is played on a table and there can be from a minimum of two to a maximum of ten players, depending on what variation of poker you are going to play. There are three main variations of poker: Texas Hold'em, Omaha pot-limit, and Omaha 5 cards and each of them has slightly different rules.
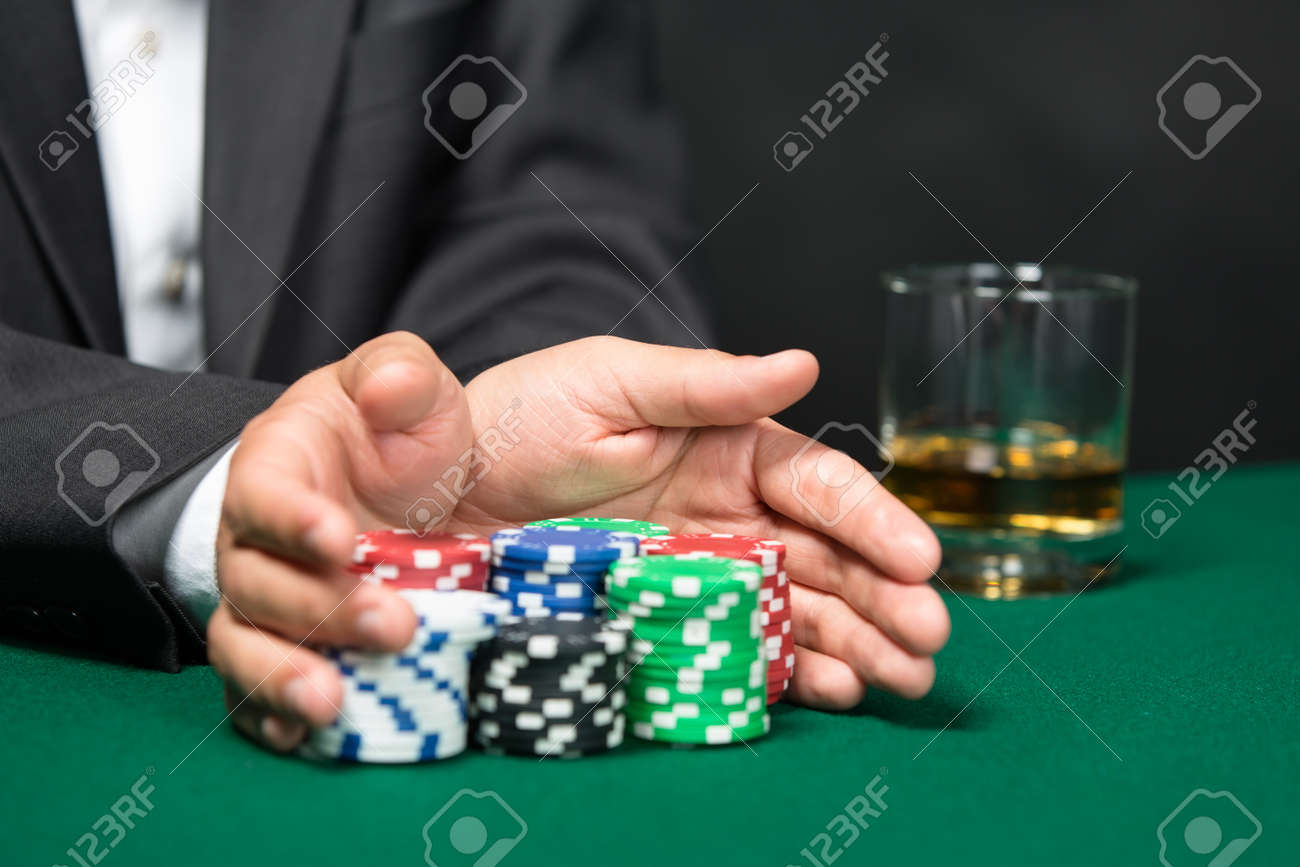
There is the option to play tournaments and cash game. In tournaments a player is required to "buy-in" an entry fee (with real money or not) and start with a certain amount of chips, it depends on the tournament and on how many people will participate. The tournament ends when all of the chips go to one player. 
In a cash game you play with your money being the chips, the value of each chip corresponds to the same value in dollars. If a player finishes his chips he can keep buying for as many times as he wants to stay in the game. A player is also allowed to quit playing whenever he feels satisfied with the amount of chips he has earned.

Resultado de imagem para kinds of poker

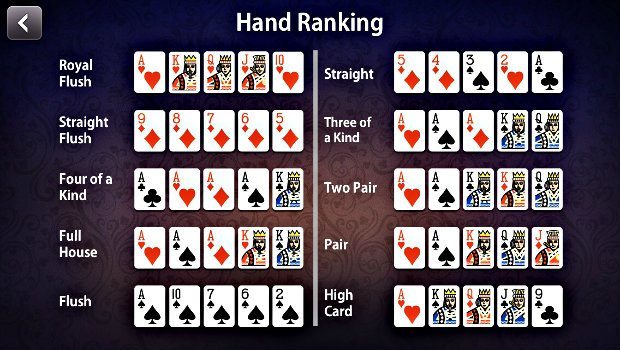
Hand Ranking is based on the different card combinations that a player can get in one had. The one with the highest value is Royal Flush where there is a Straight of the same suit with the best cards. It is the hardest hand to make. And the last hand being just High card with no set. Always taking in order what is the hardest set to make mathematically.

what are tells?

Tells are everything you do in a table of poker that can be considered a clue of what kind of cards you might have. Professional players are extremely good at not making their opponents know how good or bad of a hand they have. They also make it clear in iterviews how crucial can be being able to place a good bluff. It can result in your opponents making the wrong choice unconsciously.

What are skills?

There are so many skills a player can improve on in poker. The goal is to constantly make the opponents uncomfortable with your kind of game, by regularly changing the way that you play. This is the most important skills in my opinion. Skill is the ability to hide the tells from the opponents.

Resultado de imagem para Poker player in all in


Controlling your "tells" and skills

Poker is a complex mental game and a sport that is played among so many different levels of opponents in just one table, where each one has different thoughts and level experience. In poker a lot of little easy things can make a big difference in the final result.
First of all, while you are playing do not say anything is one way to hide the tells as a result of someone might understand your level and the way that you usually think, commentary about any hand played for some players has to be in the top of your list. 

Timing Your Action

Take always the same time to have your action, show up nervousness is a tell and it may indicate that you have good cards. So, take time, think and make the best action possible. Here are a few good steps to follow for learning how to time your action.
  1. Looking at the cards just when your turn comes 
  2. Before playing in a hand look to the chips of every opponent
  3. Take about 5 seconds to make the action
  4. After the move keep a straight face

Facial expressions 

Resultado de imagem para Poker player covering tellsMost poker's books pay special attention to facial expressions and tips to hide the tells. As it was explained before, tells sometimes happens unconsciously and there are ways to camouflage these facial expressions like: 
  • Wearing glasses
  • Wearing a hat
  • Covering your face with the hands and hood
  • Headphones

Smiles and faces can help out other players in hard decisions.

Mental Game

Poker is completely mental. It has already been proven that it is actually more mental and ability than luck, being 80% skills and 20% luck.
Vary the size of your bets according to the strength of your hand is another tell that you can put in your list of what not to do. In the beginning, it might be good, confusing for other players, but then they will figure out according to your bet how much is the strength of your hand.

Things to do before paying to feel comfortable in the table and do not make easy mistakes. If you do not do these little things before the tournament you might get to a tournament feeling anxious, sleepy which will result in making huge errors. 

  • Sleep good
  • Do not hang out the night before playing  
  • Eat good 
  • being focused on your strategy

Body Language

Body language is crucial for poker players. It is about the clue that you give or receive in a table of poker. Like it has been explained for tells, most clues in poker are given through body language, like facial expressions, and signs of anxiety or excitement. Some are more specific and can relate to each individual player and their game style. Some players might have patterns. A pattern is when a sequence of actions repeat themselves. If a player has a pattern he might act the same way in similar circumstances, which can give you a pretty good glance on what kind of had he might have. This is considered an indirect form of body language as it not an action but more of an unconscious reflection of their thought on their behavior.  

Resultado de imagem para phil ivey in body language]


In conclusion, I highly advise you follow those simple steps to step up your poker skills. Every topic discussed in this article is at the base of being a great poker player. lastly let's not forget that poker is officially recognized as a sport and as such it takes a lot of hard work and dedication to perfect. By starting to apply those simple but important tips in your daily poker games you will see yourself making mistakes, but do not give up as it is just part of the process that will lead you to success. 


Sunday, October 20, 2019

How to do a shifty crossover and get easy buckets


Its all about improving skill and getting buckets.

Basketball is a game of skill and the more you have at your disposal, the harder it is for your opponent to stop you. Tired of getting the ball stolen from you when trying to get by your opponent? Do you want to be able to shift the other team all the way across the court, making the crowd go crazy? Then the misdirection crossover is the perfect skill to add to your overall game.


These instructions are the perfect tool for you to learn this useful skill  that can give you a distinct advantage over your opponent. These key steps will teach you how to utilize, speed changes, body language, stance switching, and quick movements in order to execute an excellent crossover and blow right by your defender for easy points. Note that this a step by step breakdown of specific parts of a move, as such when executing this move in real time requires these steps to happen in rather quick succession.

What is a crossover?

One of the most widely used moves for all the positions in basketball, as well as the riskiest is the crossover. A crossover is a move that utilizes quick direction and speed changes to shift the defender off balance. The offensive player quickly moves in one direction to draw the defender towards that spot before quickly going in the opposite direction. This can potentially create a decent amount of space for an easy shot or quick drive to the goal to lay the ball up. If mastered it becomes a deadly tool to confuse and embarrass your opponents, which can also lead to easy points for you.

With fundamentals being simple and easy to learn, pro athletes are able to modify them to fit their specific game and this leads to various variations of the crossover. The specific crossover being explained in this tutorial is the misdirection cross. 

Understanding Fundamentals

Executing the fundamentals of a crossover can be the difference between blowing by your defender or getting the ball stolen. Most coaches and competitive athletes agree that a crossover needs to be a slow to quick move. Which means you start your move off slow in order to throw your defender's focus off and then quickly execute your move to blow past them. Your shoulders must be lower then your defender so you can get past them easily. This low center of gravity also helps with explosiveness by giving your legs more lunging power.

It is also very important to shield the ball with the hand not involved in dribbling the basketball, by having it level with your dribbling hand and blocking any hands that try to swipe at the ball. The ball should be close to your body, because any over exaggerated movements can lead to accidental loss of the ball or defenders swiping it. A tight handle is essential. Keeping your eyes on your defenders position as well as the position of the rim helps with situational awareness as well, but also be aware of where your teammates are encase you need to pass the ball.

So to recap important basic fundamentals:

  • Stay lower then your defender
  • Slow to quick move
  • Shield the ball
  • Keep all close to body
  • Tight handle is the best handle
  • Keep eyes on target


Step 1: Approach your opponent in a slight jog while in a high stance

Note the distance from the defender in order to execute the move
One of the most important aspects of basketball is knowing how to switch the stance your in to effectively create space and confuse your opponent. In general, when a player is standing straight up, they seem less likely to attack the basket and are usually signs they will pass or shoot. This usually causes the defender to either relax on defense or raise up to come forward  because they assume your about to shoot. In some cases the defender will stay in their defensive stance but this doesn't hinder the effectiveness of the move. The key is to come at the defender in motion.

So, for the first step the player approaches the defender in a slight jog while standing straight up and dribbling a the basketball at a slow tempo. It is important that the player has a jogging start towards the defender because this gives them momentum when starting their attack. the slow tempo of the ball dribbling tricks the defender into assuming your not about to attack because most attacking moves utilize hard pound dribbles to move quickly in either direction. It is important to focus your eyes on the defensive players position and the goal. Do not look in the direction you want to go because the defender will move to defend that position.

Step 2: Throw the basketball basketball in the direction you want to go and quickly lower your stance


This is a vital point in the crossover because it use is to setup the defender to be misdirected. Whichever hand you are dribbling with, right or left, throw the basketball in the opposite direction. That means if your are dribbling with your left hand to throw the ball to the right side of your body and with your hand to the left side. This is done while still in your high stance, preferably keeping the ball still close enough to your body to protect from the defender stealing it. This move will put your defender back in a defensive stance as they try an anticipate your next move.

Ball off to the direction intended but still close to body
After you throw the ball to your designated side, quickly lower your stance, which means to quickly lower your body to a near crouch and to dip your shoulders, slightly lower then your defenders. These steps happen relatively quickly so it is important to practice throwing the ball and stance switching repeatedly until you are absolutely sure you can do it and maintain control of the ball. This stance switch will make your defender change position to try and prevent you from driving to the basket, as such the next step will throw off their balance by tricking them.

Step 3: Jab step in the opposite direction you want to go and lean your body to that direction

How it would look from the defenders perspective

After you have lowered your stance and your defender is readily awaiting your next move, quickly step in the opposite direction you threw the ball with the foot matching that direction. So if you threw the ball to your left that means you step to the right with your right foot and if the ball was thrown to your right then you step to the left with your left foot. It is important that this step is hard and quick to force the defenders reaction.  This is called a jab step and is a frequently utilized tool in high level basketball. This opposing step to the direction of the ball makes the defender jump to the side your body is moving because they think that hard step is an indicator of the direction you want to go. Defense in basketball is about predicting opponents moves, as such the defender will be forced to assume that you are about to explode in that direction.

The vital second part to this move is your overall body movement. Even though you don't actually want to go in the direction your stepping, its important to make the defense believe you do. This trick is achieved through your body movement. By leaning your body to the side you stepped, you give off the impression of commitment to that action. This is further strengthened by you looking in that direction you stepped and key part to this step. Deception is a ball handlers best friend so any tools at your disposal must be utilized. You can pretend your calling to a teammate or even pointing in the direction you stepped can make the defender move to that spot to try and prevent whatever action they think your committing too.

Step 4: Push off the foot you jab stepped with to change speed and accelerate toward the direction you threw the ball


The essentials of any crossover moves require speed changes. For the misdirection crossover, the speed change after the jab step is what helps blow by the defender with ease. After jab stepping and leaning to the opposite direction you want to go, push off hard with the foot you jabbed with in order to explode by your defender.

While still leaning in the direction opposite of where you threw the ball, tighten the muscles in your leg you jab stepped with and push downward while quickly moving your body to the side you actually intend to go. Kick off the ground as if you were starting a raise and just too off with a strong start. The strong downward pressure and muscles contracting and extending give a sudden boost in speed and shocks the defender.

Step 5: Kick off with your other foot to fully blow past defender while using off hand to defend the basketball

The final step to the misdirection crossover is to use the foot you didn't jab with to further push past your defender in a further burst of speed. You kick off with the opposite foot from the one you jabbed with to push past the defenders arms and body. If you jabbed with your right foot then this step involves you kicking off with your left directly after that step. The same concept of kicking off the ground downward and leaning forward to propel yourself applies to this step as well just with  This step is the most important step in terms of getting directly to the basketball goal. The resulting extra explosiveness created from kicking off with your other foot helps to extend past defender who is already trying to recover from being thrown off balance. 
After kicking off with your back foot the next step is to use your off hand to shield the ball as you explode past your defender. its important that your hand is level with the ball to insure you can defend against the reaching hands of the defender. After this step is complete all that is left to do is dribble directly to the hoop or pull up for a jump shot.

Recap

Quick overview of steps:
  1. Start from high stance and have jogging start
  2. Throw basketball in direction you want to go and lower your stance
  3. Jab step in opposite direction you want to go and lean toward that direction
  4. Push off the foot you jabbed with and accelerate in that direction
  5. Kick off with other foot to blow by defender and use offhand to shield basketball
The misdirection crossover is an excellent skill to add to any players game no matter the position because it can be utilized in so many situations. Its a move that's simple enough that any age range can learn it but complex enough that it can be further modified to be used at higher levels of competitive play. I very much like this crossover and utilize it quite often when I'm playing basketball. There are many different crossovers you can learn and each has its own pros and cons but if your looking for easy to learn go to crossover then the misdirection crossover is a great skill to learn.

A Beginners Guide to Clipping Beef Show Heifers

Clip your show calf like a professional


Many livestock exhibitors cannot say that they know how to clip their own animal out at the shows. Are you one of those showers who want to be able to proudly say that you clipped your own project out? Keep reading this article for some of the best tips on learning how to clip your own livestock project out.

Every year, in Perry, Georgia, exhibitors pay top-dollar for their cattle to be clipped by the best people known. Since, it is considered "your" project, it should be your job to do these tasks on your own. Just simply knowing the variety of blades, knowing how to use the clippers for each body part, and practicing, over and over, the techniques of clipping will lead you to clipping like a professional. 

Fresh clipped show heifer 

What do I need to be a successful clipper?

It may seem like this is not a big investment, but in turn it all adds up. Everything is sold separately such as the clippers, different blades, and lube/oil. More specifically, the needed products include:

Clippers:
  • Five Speed Andis Clippers
Blades:
  • ShowEdge Medium Blade
  • ShowEdge General Blade
  • Super Blocking Blade 
  • Medium Blending Blade 
  • T-84 Blade
  • 3/4 HT Blade 
  • 5/8 HT Blade
Lubricants: 
  • Endurance Oil 

Clippers, blades, and lube 

Clipping the different body parts 

In order to get a clean cut, you must know that each blade cuts differently. All blades are made differently for a reason. Mainly, blades are made for the face, neck, shoulder, body, legs, and tail. 

Clipping the face

The face is one part of the body that the hair needs to be neat and short. You want a heifer to have a very feminine face. On the face, you want to use ShowEdge Medium, ShowEdge General, Medium Blending, or T-84 blades. These blades are made for the face and provide cleaner strokes. Although all these blades are made for the face, the main two used are the Medium Blending and T-84 blades. The Medium Blending blade cuts closer and blends out the hairs. However, the T-84 blade does not get as close of a cut, but at the same time, ensures you do not cut too close to the skin.

Clipping on the neck 

Another part of the body that needs to be cut short is the neck. One main concern with the neck is its very easy to get a "choppy" cut, but judges look for very angular heifers. This can be avoided using any of these blades: Medium Blending, T-84, 3/4 HT, or 5/8 HT blade. Depending on the thickness and length of the hair, the 3/4 HT or 5/8 HT blade may need to be used. These blades are basically used for longer hair. Then, the Medium Blending or T-84 blades are used to smooth lines. 

Clipping the shoulder

This is one body part that can place you anywhere from first place to last place, depending on how picky the judges are. This is another area that should be smooth and clean. Using the Super Blocking, Medium Blending, 3/4 HT, or 5/8 HT blades are a must for the shoulder. The Super Blocking blade is great for hair that is matted down in the shoulder area. As you clip, the shoulder, you are trying to create a narrow, smooth front. 

Clipping the shoulder area 


Clipping the body 

The body, in general, needs to be symmetrical, which means also the hairs need to be the same. Clipping the body includes large sections, these are around the navel and down the top of the heifer around the loin area. It is best for clipping in these areas to use ShowEdge Medium, ShowEdge General, or Super Blocking blades. When clipping down the top of the heifer, your main goal is to make sure her top is level and she does not have a large dip in the middle of her back. When clipping in the navel area, you want to create a fullness effect where your heifer is going to look like she has a greater depth of body. 

Clipping the legs

You want the legs of a heifer to appear big boned and straight. To make them appear like this, it is important to use Super Blocking or Medium Blending blades. An important note when clipping the legs is that you always need to clip up the leg. This will allow a clean cut and make the leg appear straighter. 

Clipping the tail 

This is another part of the body that judges examine very closely. the tail head should be neat and set slightly above but not too high. When clipping the tail, you should use ShowEdge Medium, ShowEdge General, Medium Blending, or T-84 blades. To accomplish this look, you want to clip the tail head as tight as possible. This means clipping the hair short and depending on the breed of your heifer it can be clipped differently. 

Steps to get you clipping quickly:
  1. Lube all blades first
  2. Turn clippers on and start with the face (make sure you have correct blade on) 
  3. Start with the lowest speed and work your way up
  4. Start taking off hair 
  5. When done make sure to store clippers in a dry, cool place 
*It is important to keep all blades lubed to reduce the chance of overheating.

Success depends on practice 

The only way you will become a stronger clipper is to practice. This means practing on different cattle in your herd and maybe past show heifers. Every heifer is different, so practicing on several helps you conform to clipping better. Also, practicing more often allows you to get used to changing the blades and changing holding positions of the clippers. It takes time to adjust to clipping so it helps to find your own style to clipping. There is no right or wrong way to using clippers, just remember what you want your result to look like. 

Remember, when clipping, to relax and have fun because there is no reason to stress. This will allow for a better clip. Now, you are one step closer to clipping like a professional. 

Practicing on a previuos show heifer
                                                    
                                                    
*All images contributed are my possession.

How to spray with little to no recoil on PUBG mobile

How to spray with little to no recoil on PUBG mobile

Eventually as you progress through any game you have to learn different skills and techniques in order to be an above average player. In PUBG mobile it is important for every player to be able to effectively spray from distance. Instead of single firing at your enemies you can fire your gun in full auto with little recoil, which puts you at an advantage compared to everyone else. These following tips can help you out next time as you step foot onto the battlefield.


What is a Spray?

Essentially, spraying is whenever you fire your weapon on full auto from medium to long range (around 100 meters to 340 meters), instead of single tapping. this allows you to kill your enemies faster. However, guns that are full auto have recoil and it becomes harder to control the recoil as the distance of your enemies increase. On the PC and console version of PUBG it is generally harder to control recoil, which makes spraying harder, but on PUBG mobile they simplified the recoil patterns and overall they made spraying easier. However, you still need to optimize your settings and sensitivities so you don't miss the majority of your shots. 


Methods for Recoil Control

There are two methods for recoil control, Gyroscope or pulling your finger down as you shoot, however you can't really use both, its either full gyro control, or you just use your finger. This is because when you tilt your device downwards you have to pull your finger downwards as well, which leads to errors. 

Gyroscope

Gyroscope is whenever you move your phone ,and the screen on the game follows that motion. So if I tilt my phone downwards, then the camera in the game moves down as well.


Thumb/Finger

Dragging your finger down is another option for recoil control. This option is also good, but depending on the size of your screen it could be hard. For example if your playing on an iPad, you don't need gyro because the screen is so big you can just drag your finger down. Both of these options require you to tweak your settings so your recoil control can be effective.


Settings

There are many settings within the game that you can fine tune to your preference. Under the sensitivity tab in the settings there are three main categories for your sensitivity, these are camera sensitivity, ads, and gyro sensitivity. Within these three categories there are individual sliders for each scope which effect that specific sensitivity. These sliders range from 1% to 300%. The following list includes recommended ranges for each slider, there is no exact number that works for everyone because it comes down to personal preference and what that person is most comfortable with.


Camera Sensitivity

This setting affects how the camera moves while your aiming down sight, but not shooting. This allows you to move the camera fast or slow, depending on the scope. The following are the recommended ranges for each slider, within the camera sensitivity

  • Red dot : 30 to 80
  • 2x scope : 30 to 80
  • 3x scope : 20 to 40
  • 4x scope: 10 to 35
  • 6x scope: 10 to 18
  • 8x scope: this scope can only be put on a sniper, but the recommended range for sniping is 8 to 12
You can always go higher or lower than these ranges, but these are most helpful for people that are beginning to spray

Ads Sensitivity

This setting affects the camera movement as you are aiming down sight and shooting. So as your shooting your thumb/finger can move the camera to control recoil. The following recommended ranges are:
  • Red dot : 50 to 80
  • 2x scope : 50 to 80
  • 3x scope : 30 to 40
  • 4x scope: 20 to 30
  • 6x scope: 15 to 25
  • 8x scope:8 to 15
If you use only gyro for recoil control, you don't need to touch your ads sensitivities, but it's always best to adjust them.

Gyro Sensitivity

This setting affects the camera movement as you are aiming down sight and while you are shooting, without having to use your finger for recoil control. So if you move your device in any direction, the camera will follow your devices direction. The following recommended ranges are :

  • Red dot : 150 to 300
  • 2x scope :150 to 300
  • 3x scope :120 to 200
  • 4x scope: 60 to 130
  • 6x scope: 60 to 110
  • 8x scope:20 to 60
If you are only using your finger/thumb for recoil control you do not have to adjust these settings at all. Also many pros and highly skilled players have these sensitivities a bit higher than the recommended range, so as you begin to get better you can always come back to your settings and adjust them.

Best Guns for Spraying

There are a range of guns in PUBG, the best type of guns for spraying are guns that already have low recoil and that are automatic, which are basically AR's, with some exceptions. The following list is my opinion on the best guns for spraying and what the community mostly uses, plus they are in no particular order. 
Aug


  • M416
  • Scar-L
  • Aug
  • QBZ
  • G36c
  • VSS
  • Dp-28

M416


Best Attachments

There are also a wide range of attachments for these guns. They all make the gun feel different and can affect the recoil pattern. The following list shows the best attachments for spraying, according to the community.

Muzzle Attachments

Image result for compensator pubg mobile
Compensator
  • Suppressor :The suppressor does not affect recoil at all, it just makes the gun quieter whenever you shoot
  • Flash hider: This hides the flash of your gun when you shoot, and it reduces recoil slightly
  • Compensator :This reduces recoil the most, it's the best for recoil control
It comes down to personal preference for these, but the compensator is the best for recoil control


Grip Attachments

There are a total of 6 different attachments that can be used on these guns. They all have different functions, but the following list highlights the best three, according to the majority of the community

  • Angled fore grip: Reduces horizontal and vertical recoil, and it makes scoping in slightly faster
  • Vertical fore grip: Reduces vertical recoil
  • Half grip:reduces overall recoil, increases recoil recovery, but it reduces stability when firing

Best Scope Attachments

Hands down the best scopes for spraying are the 3x, 4x and 6x scoped down to a 3x. These are the best because if you want to spray from distance you need to magnify your view on the enemy. But they do have their pros and cons


3x scope

4x Scope
  • 3x : The 3x has more "visibility" than the other scopes. Which means as you are scoped in you have a wider field of view, so you can spot enemies better. One downside is that the reticle has a weird shape that not all players like
  • 4x: Mainly used whenever the 3x can't effectively be used at long ranges, so its better for longer ranges. 
  • 6x: Can be adjusted to be a 3x or a 4x, and it has a clean reticule so many players prefer it. Also it is a versatile scope because it can be used for sniping as well.


More Examples of Spraying


Don't Potato!

Learning how to spray in this game is a key factor in winning gunfights, but you won't be able to just change your settings and be a straight laser, this skill takes time to develop, just like many other skills. Personally, it took me a couple of weeks to just find the perfect sensitivities for every slider. Everybody has unique settings within the game, different playstyles and different attachment/gun combinations, it's up to you to experiment and see what you like.


How to Perfect Your Makeup Application Process

Why Wear Makeup?

Are you an average person that prefers to wear makeup and would like to perfect your skills? If you wear makeup on a daily basis or even perhaps special events, you would prefer it to appear flawless. Makeup is the perfect way to enhance your natural beauty. It is a simple art that even a child will occasionally attempt to master. Having seamless makeup requires various steps that can become tedious. However, using different techniques will shorten the application process and improve your overall look.

Prep Your Skin

Starting off with fresh and clean skin is essential to this process. To prep your skin, use your favorite face cleanser to remove any dirt or oils. Skipping this step can make your makeup appear clumpy, or even greasy. To be even more cautious, take an ice cube and rub it along your face for a few seconds to minimize and close large pores.

Know Your Skin Type

Understanding if your skin produces more oil or does not guides you on how you should moisturize your skin after cleansing it.

Oily

When moisturizing oily skin avoid applying moisturizer in the most oily areas. Depending on how oily your skin is a moisturizer could be necessary.

Dry

Having dry skin means you must apply a moisturizer after your face cleanser. If you do not do this your makeup can become clumpy. Also, your skin could peel; which, is not the ideal base for foundation.

Oily and Dry

this skin type requires you to apply a moisturizer on the driest areas of the face. Usually, for people with this skin type it is the area out side the "T-zone" that is dry. The "T-zone" includes your noise, eyelids, and under eyes.


Know Your Undertones

There are three categories that foundations are made to match best with your skin tone. Foundations are distinguished as cool, warm, or neutral. When purchasing foundation next to the name of the shade or number, it will say if it is one of them.

Cool

Your skin appears to have hints of blue, pink or slight red color.

Warm

Your skin appears to have a base tone of yellow and gold.

Neutral

Your skin is a combination of both cool and warm. The undertone resembles your actual skin tone.


Conceal Any Blemishes

After distinguishing your undertones you are now ready to apply the base of your makeup. Most people have natural blemishes and acne scars that would like to conceal. However, sometimes it is hard for them to achieve this goal without using too much product. If discoloration, acne, uneven skin tone, or puffy under eyes is a problem for you then color corrector, foundation, concealer, and face powder are your new best friends.

Color Corrector

If you struggle with any dark spots or discoloration, use a color corrector. For fair skin tones its best to use a green or purple color. However, for medium to dark skin tones use an orange or red color. This is important, so your foundation looks uniform throughout. For the best results, use a wet or damp beauty blender to make sure everything is blended evenly into the skin.


Foundation

If the color corrector was not necessary in your situation, still apply the foundation all over your face. Foundation is meant to bring your natural color to your face. Place a couple of pumps of foundation to the back of your wrist to warm it up. This makes blending easier and more efficient. If you need more coverage continue to apply and blend well.


Concealer

Concealer should be around two shades lighter than your actual foundation. Once your foundation has been applied, go in with concealer underneath the eyes and on the bridge of the nose. If you have under eye bags, consider purchasing a full coverage concealer, or reapplying layers of concealer. You can also go around the outer edge of your eyebrows to shape them. It is important to focus on blending because this is not your actual skin color.


Face Powder

Makeup tends to move because of sweat, heat, or just because of how long you have had it on. Face powder is meant to keep your foundation or concealer from moving throughout the day. Setting powder, bronzer, blush, and highlighter are essential components to a glam finish. After a setting spray has been sprayed, these powders soak in together and will stay put.


Setting Powder

Apply this on top of your concealer using a triangular shape sponge or a flat beauty blender. Let it "bake" or sit for one minute. Finally, brush away using a fluffy powder brush.


Bronzer

Apply this along your cheekbones and temples of the forehead. Make sure this shade is around one or two shades darker than your foundation in order to contour your face. Use narrow strokes along the sides of the nose to make the nose appear more narrow.

Highlighter

Highlighter is far most one of the most important parts to having flawless makeup. Highlighter is meant to make the high points of your face stand out when there is any light reflected along them. It is so quick and simple to put on. The quickest and most efficient way, is to use a fan brush because precision is essential.

Bring Your Eyes and Brows to Life

Not only should you have flawless skin but your eyes and brows deserve the same attention. Filling in your eyebrows are simple, just take your favorite eyebrow pencil and spoolie to shade in and define your natural brows. However, if you want your eyes to really stand out, applying eye-shadow includes these steps:
  1. Prep eyelids with a very light concealer to make the eye-shadow colors stand out.
  2. Set with a setting powder so the eye-shadow stays in place.
  3. Apply a transition color above the crease of the eyelid.
  4. Blend a darker color to define the crease line.
  5. Place a lighter or shimmery color on the actual lid part of the eye.
  6. Apply eyeliner and mascara to finish the look.


Using this technique for your eye-shadow enhances your eyes. Not only this, but depending on the colors you choose to use it can bring out your natural eye color. Extending your eyelashes with mascara or using false lashes makes your eyes standout and gives your makeup a signature look.


Admire Your Beauty

Embracing makeup alone is the perfect way to express yourself. It is another method to display art on either yourself or someone else. You can wear makeup for many purposes. Perhaps, if you're in the mood to stand out and boos your confidence. However, make sure not to forget to embrace your natural beauty underneath all of your hard work. Not forgetting having to prepare your skin, match the right foundation, contouring your face, and completing your eye-shadow and brows to achieve your glam look. 
Considering the various steps, there are tips and tricks that improves your overall look to have a flawless finish. For instance, knowing your skin undertones, using setting powder to prevent your makeup from moving, wetting a sponge for blending, and spraying your face with a setting spray to complete the look. With practice and if done correctly, you will get used to having seamless makeup.


How to Know the Depths of the Ocean Have you ever imagined breathing underwater for hours at many meters deep? Have you imagined bei...